Continuous Integration in Blogging
2019-09-11
My website’s backend has recently migrated from Hexo to Hugo. The former was written in Node.js and suffered severely from compiling huge files. The latter, on the other hand, is a golang-based static site generator and thanks to that I now only need to wait <2 seconds before a complete rebuild, despite my increasing number of posts. I have no intend to generate another piece Internet garbage repeating what I actually did during the migration. You may find tens of posts already there if you Google it. However, today I’d like to share how I manage to maintain my blog in a continuous integration way:
Continuous Integration (CI) is a development practice that requires developers to integrate code into a shared repository several times a day. Each check-in is then verified by an automated build, allowing teams to detect problems early.
In English, it means “store everything together”. I assure you this is way better than describe above. At least it saves my life. Anyway, now that everyone is one the same page, let’s start bit by bit.
Repository
I store everything on GitHub. As most people do, the repo’s name is {{user_id}}.github.io. This is a public repo. In this repo you will find all the compiled HTML files, locally they appear in your public folder of your website. However, this repo doesn’t just serve as the hub for my website, but also for all the comments. See below.
Comments
I’m using Gitalk as the commenting system for my website. It’s neat, customizable and best of all, stores every piece of comment as a GitHub issue. I was originally using another repo for these comments but recently, after GitHub launched their issue transferring feature, I successfully ported all the old comments onto the repo I mentioned above.
Back-up
Everyone needs somewhere to back-up his stuff, and this principle is especially true for blogging. I’m storing the whole website folder on a private GitHub repo ignoring the public folder. In this way, not only the posts (.md files) and media (.jpg, .png, etc.) are saved securely, but also the site configurations, the theme customization (this can be especially frustrating if you mess with a lot of .css and .js files) and basically everything else, are backed up perfectly. That been done, when you change a blogging environment, all you need to do is to clone this private repo on your new machine and pretend nothing has happened.
Shortcuts
I’m lazy, too lazy to type a single command in Terminal. To solve that issue I now need two tools.
Bash Scripts
There are two scripts I use: deploy and backup. In order to deploy (update) my website, I push everything in the public folder onto the public repo, namely the one ending with .git.io:
#!/bin/bash
# deploy.sh

echo -e "\033[0;32mDeploying updates to GitHub...\033[0m"
hugo
cd public
git add .
msg="rebuild and deploy `date`"
git commit -m "$msg"
git push upstream master
cd ..
The other script was intended to back up everything of my website.
#!/bin/bash
# backup.sh

echo -e "\033[0;32mSaving backup to GitHub...\033[0m"
hugo
git add .
msg="backup `date`"
git commit -m "$msg"
git commit -m "backup `date`"
git push upstream master
These are saved under the root directory. Before actually using these scripts, you also have to grant required system permissions to them, simply:
chmod u+x deploy.sh backup.sh
Alfred
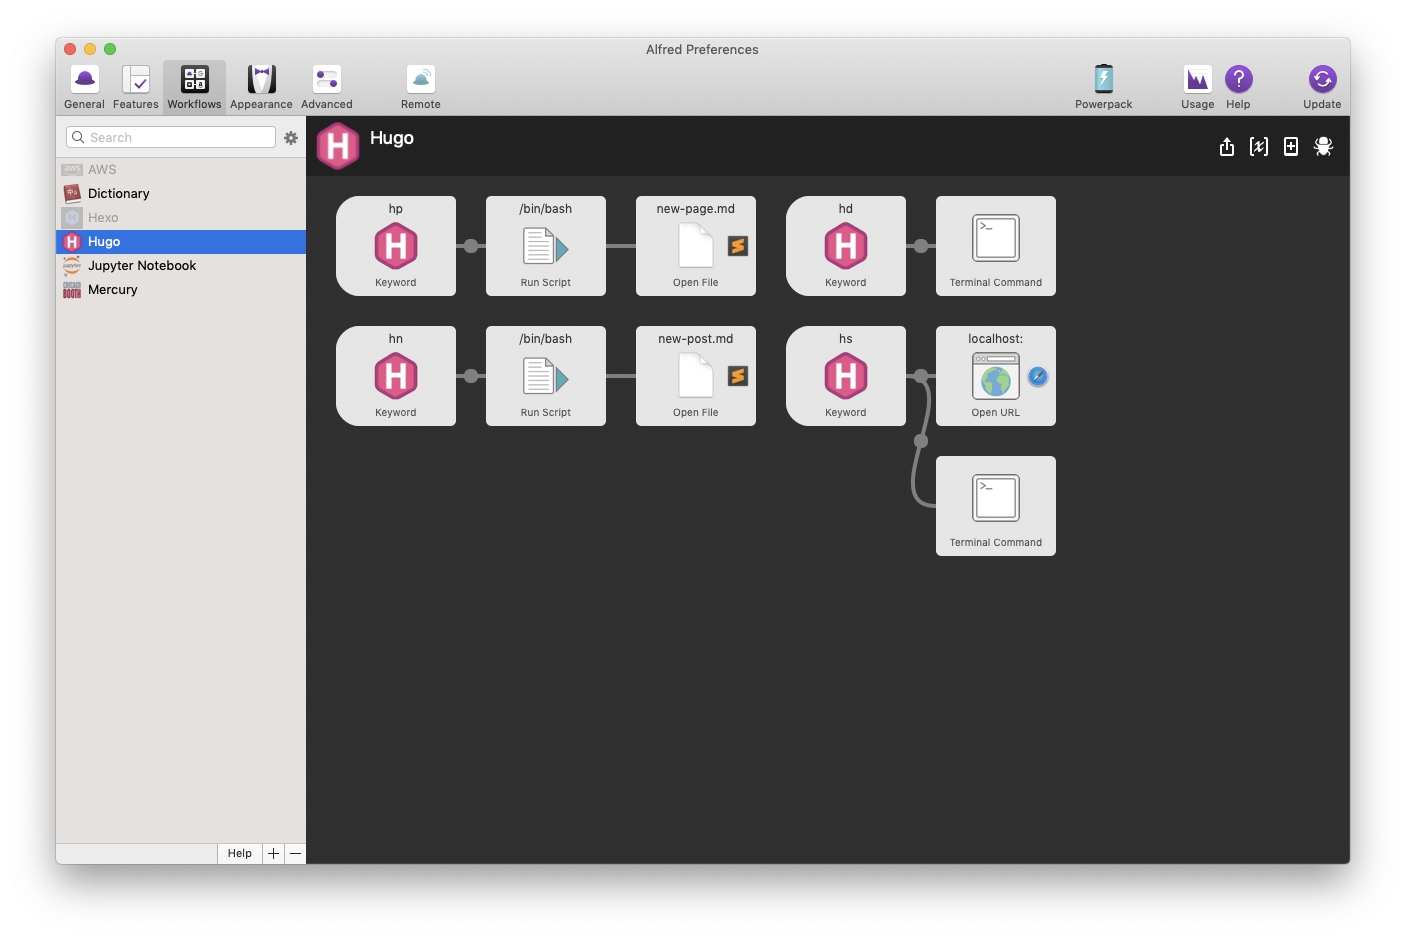
I love Alfred. This is the best productivity app that I will personally recommend every single friend of mine to install. You can search on the Internet how this thing works in different scenarios. Here I use Alfred to create shortcuts and workflows in blogging. The final workflow looks like this in Alfred:

Here I defined four commands under the Hugo project, namely hp for new page, hn for new post, hs for local server preview and hd for deploy. The first two are designed such that they copy a template markdown file saved in the layouts folder into the content or blog folder, and then open it in your preferred text editor. The hs command starts the server while simultaneously opens localhost:1313 in your browser. Lastly, the hd command triggers the following:
cd {{root_of_website}}
rm content/new-page.md &>/dev/null
rm content/blog/new-post.md &>/dev/null
./deploy.sh && ./backup.sh
Here it deletes new page or post files that are copied but not edited, after which it deploys the website and then finally back everything up onto the private repo.
Result
My final workflow ends up like this (I config Alfred s.t. all I need to activate it is just a double-click of ⌘):
- Enter
hsin Alfred to start preview. - Enter
hnin Alfred to create a new post. - Rename and edit the post, after which close everything.
- Type
hdin Alfred to deploy (and backup).
